Tag Archives: Breads/Muffins/Etc

“Guess what? I have flaws.”

What are they? Well, to quote Michael Scott, “I sing in the shower. Sometimes I spend too much time volunteering. Occasionally I’ll hit somebody with my car.”

(To clarify, I have never actually hit someone with my car, and if I had I would have totally disclosed that on my bar application.)

Also, I am bad at math, I always forget my parents’ anniversary, and once I took the introductory personality inventory on eHarmony and they told me I was un-matchable. (Really! Some follow-up googling revealed this interesting explanation. Ouch.)

Finally, the flaw that is pertinent here: I can’t leave “good enough” alone when it comes to recipes. My mom and I have both had success with these strawberry jelly surprise muffins from Daily Garnish. But today I decided to try making them with brown rice syrup instead of sugar, as well as a few other tweaks. It was a noble goal, but the execution was poor. I show you these pictures to dispel the myth that just because I write this blog I am some kind of wizard in the kitchen. Sometimes things go wrong, and, for example, I end up taking a partially used bottle of wine to a potluck instead of the fruit crisp I had planned because said fruit crisp looks absolutely disgusting. Anyway, back to the muffins. Things started off well…

(Dry ingredients, flax egg, wet ingredients, and the strawberry jelly with a little chopped rhubarb mixed in for pizazz.) I spooned in the batter, filling, and more batter to top them off…

…and then baked. And then…MUFFIN DISASTER.

That is a decapitated muffin, in case you couldn’t tell. These did not hold together at all, and the tops were way too crunchy.

In conclusion, just try the recipe linked above. It’s fine just as it is. And I AM TOO, eHARMONY.

Treasures from times gone by…

It has been a little over a week since I moved into my parents’ basement, and I have made some spectacular discoveries.  For example, feast your eyes on the dress I wore to Jefferson-Scranton High School’s junior-senior prom, circa 2003:

Yes, it totally still fits, thank you for asking.  It just doesn’t zip, which is a minor detail.  A strategically-draped shawl, a few safety pins, and BAM, I could be ready for my very own royal wedding in ten minutes, tops.

(Oh, by the way, isn’t my mirror charming?  My sister-in-law painted it for me many, many years ago.  She’s all kinds of brilliant and artsy!)

I also found……drumroll…….

5-5-2010 002

My very first cookbooks!  Do you remember the American Girl dolls?  I swear, everybody I knew when I was a tiny little Darcy had one of those dolls, and about fifty outfits for it.  I was not into the dolls, but I was really into the cookbooks.  They came in a set of five: Molly (World War II era), Kirsten (pioneer girl), Addy (escaped from slavery on the Underground Railroad), Felicity (daughter of the Revolution), and Samantha (hoity-toity turn-of-the-century girl with a butler).

They’re full of historical information and easy recipes one could make with adult supervision, AND in the back of each one there are detailed instructions for throwing a theme party.  Molly’s book, which was my favorite, was set in 1944 and had instructions for throwing a “patriotic slumber party.”  Here’s a tip:

Uhhh, sure.  Or, how about you just don’t invite fun-haters to your patriotic slumber party?

Here are two of my favorite recipes from Molly’s book.  They’re both really easy, but the first requires a knife and the second requires a hot oven, so if you are not an adult, please find one to supervise you.  I definitely waited until my mom was home for the hard parts.

Frozen Fruit Cups (adapted—barely—from “American Girls Pastimes: Molly’s Cookbook”)

Makes 8-12 small cups (I used 8 oz. cups and made 9)

  • 1 c. orange juice
  • 15 oz. can of crushed pineapple in its own juice
  • 1 small (about 11 oz.) can of mandarin oranges, drained and coarsely chopped
  • about 3 cups sliced strawberries
  • 2-3 bananas, sliced
  • 1 1/2 c. club soda

These are not rocket science, obviously, as the recipe came from a cookbook for elementary school-aged children.  But they are delicious, and a great refreshing snack for summer.  I used to make them all the time and eat them while swaying in my mom’s hammock with a Babysitter’s Club book.  Feel free to substitute whatever fruit you like, your favorite juice, and 1 1/2 cups of something fizzy (the original recipe calls for ginger ale, which is good, and I’ve also used 7-Up).  Stir everything up in a large mixing bowl, ladle the mixture into small cups, and freeze.

Raisin Bread in a Can (adapted from “American Girls Pastimes: Molly’s Cookbook”)

This recipe didn’t have a lot of fat in it (because, as explained in the front of the book, Molly and her mom were conserving for the war effort).  It also only had one egg, so I went ahead and made a few adjustments to vegan-ize it.  To bake, you need a clean, empty coffee or juice can—about 45 ounces.  You could use a loaf pan, I suppose, but where’s the fun in that?

  • 3/4 c. white flour
  • 3 tsp baking powder
  • 1/4 tsp baking soda
  • 1/2 tsp salt
  • 3 tbsp sugar
  • 1 1/2 c. whole wheat flour
  • 1/3 c. chopped nuts (I used walnuts, leftover from my rapture cupcakes)
  • 1/3 c. raisins
  • 1 flax egg (Mix 1 tbsp ground flax with 3 tbsp water in a small bowl, and allow the mixture to thicken for 5-10 minutes)
  • 1 tbsp canola oil
  • 1 1/4 c. almond milk
  • 1/4 c. molasses

In a medium mixing bowl, combine the white flour, wheat flour, baking powder, baking soda, salt, sugar, nuts, and raisins.  In a large mixing bowl, combine the thickened flax egg, canola oil, almond milk, and molasses.  Add the dry ingredients to the wet ingredients and stir until well-combined.  Grease a large, clean tin can (about 45 ounces), and pour in the batter.  Bake at 350 for 1 hour.  After an hour, place the can on a rack to cool.  When it’s cool enough to handle, loosen the bread from the sides of the can with a butter knife and try to shimmy the bread out of the can.  If you’re having trouble, use a can opener to open the bottom of the can and carefully push the bread out.

Housekeeping: the address for the blog is now http://shesingsatthetable.com, not https://shesingsatthetable.wordpress.com.  Update your Google readers (or whatever you kids use to read your blogs these days) accordingly, pretty please.

Also, thanks to my web designer/13-year-old niece, you can now “like” She Sings at the Table on facebook—see the link on the right side of the page.  That’s all for now—have a marvelous week!

Tough bananas

There is a certain professor at the law school who has a name for what a court will give you if you go to it asking for a remedy it doesn’t have the power to grant: a “Writ of TOUGH BANANAS.”  Well, every time he says this I think to myself, “That seems kind of harsh.”  If I were a judge, I would never issue a Writ of Tough Bananas.  I would issue a Recipe (nay, Wrecipe) for Delicious Banana Bread.

5-5-2010 002

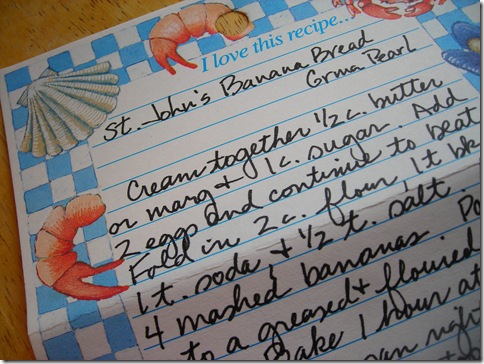
I think every good citizen should have a foolproof recipe for banana bread, so if you don’t have one, get ready to write this down!  This recipe was my Great Grandma Pearl’s, and I have no idea why it’s called “St John’s Banana Bread.”  Maybe Saint John baked when he wasn’t baptizing?

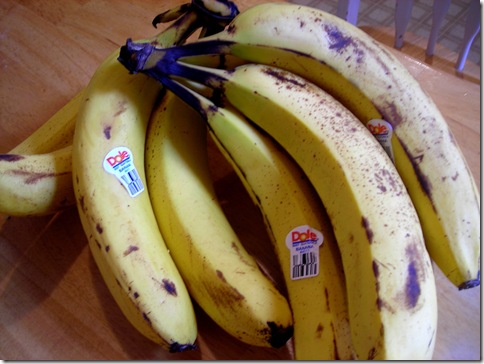
I have this giant pile of bananas because they were left over at a 5K I helped out with last Saturday.  (I was originally going to run the 5K, but……they needed help signing people in and, uhh, I had a big meal the night before.)  I am very opportunistic when it comes to free produce, so I scooped up as many as I could carry.  It never hurts to have overripe bananas in your freezer, my friends.  They are perfect for baking, smoothies, and BANANA SOFT SERVE.

Normally I would try to take this recipe and decrease the sugar, add some whole wheat flour, etc.  But there are a few cards in my recipe file I just don’t mess around with, and this is one of them.  I follow it to the letter, and it never lets me down.  (Except for the fact that my mom clearly wrote “4 mashed bananas” on the recipe card, and that’s crazy talk.  It’s 2—see the recipe below.)

This is so easy there’s really no need for step-by-step photos.  Just do me a favor and DON’T forget to butter the top of the loaf and sprinkle it with sugar right after you take it out of the pan.  This step is mandatory, and if you skip it, both Great Grandma Pearl and I will be very disappointed.

Oh, and one final note—if you have two loaf pans and a plethora of bananas, you might as well just double the recipe.  It’s no extra work, and then you could give a loaf away to someone.  I think banana bread is the perfect baked good for gift-ing—it’s easy to transport, most people like it, and it just says “Hey, I think you’re really neat and you deserve a good breakfast and/or snack.”

St. John’s Banana Bread

  • 1/2 c. (1 stick) butter, room temperature
  • 1 c. sugar
  • 2 eggs
  • 2 c. flour
  • 1 tsp baking soda
  • 1 tsp baking powder
  • 1/4 tsp salt
  • 2 large, overripe bananas, mashed (You want a little over a cup)

Cream together the butter and sugar until light and fluffy.  Add the eggs and continue mixing until well-combined.  Fold in the dry ingredients, and then the mashed bananas.  Pour the batter into a greased and floured loaf pan and bake for one hour* at 350.  Remove from the pan immediately, butter the top of the loaf, and sprinkle with sugar.

*I usually bake this for the full hour, but you might want to check it at around 55 minutes or so.  If you over-bake, you really will have Tough Bananas, and that would be a shame.

Onward and upward!  Until next time, fair friends.

Muffin makeover

Last night I had my fellow students from the study abroad program I did in France over for sangria and crepes.  It was lovely!  And—it provided some baking inspiration.  I have a framed recipe hanging in my kitchen, and someone asked about it.  Let’s just say I have a long history with this particular recipe.

Over a period of approximately 10 years, starting when I was in middle school, my mom and I made this recipe at least once a month—always in the form of muffins instead of bread.  It’s a “friendship recipe”–one of those deals where you get the starter for the batter from someone else, and then when you make the recipe you end up with starter that you have to pass on to other people.  It’s a vicious cycle.  Especially when you live in a town of  about 4000 people and you only know a certain percentage of them well enough to approach them with a Ziploc baggie full of stinky, fermenting muffin batter.

But once we started, it was impossible to break free!  Cinnamon muffins were the official food of my high school career.  I have a friend from high school who I think only hung out with me because she knew we would always have them in the freezer when she came over.

And then, one fateful day, our starter inexplicably turned moldy.  I think it was Mother Nature’s way of saying “Stop making these muffins, you psychos—they have no redeeming nutritional value and nobody else wants to be dragged into this!”  Just like that, no more cinnamon-y starts to my mornings.  I hadn’t thought about the recipe for quite some time, but last night when someone noticed it hanging above my sink and mentioned it, I decided I would try making up a starter-less version that would be similar, but healthier.  After a quick perusal of my mom’s recipe binder, I was ready to go.

5-5-2010 008

Muffins are super-easy, so there’s no need for lots of step-by-step photos here.  You just dump everything into one bowl and mix until just combined, spoon the batter into the muffin tins…

5-5-2010 019

…bake, and BOOM—basket of muffins.

These have the same flavor as the originals (thanks to cinnamon and a non-negotiable box of Jello butterscotch pudding), but with a lot less sugar and oil.  They also have happy, healthy stuff added in—oatmeal, whole wheat flour, and ground flax seeds.  My little muffins are all grown up!

New and Improved Cinnamon Muffins (makes 16-18)

  • 2 c. almond milk
  • 1 tbsp cider vinegar
  • 1 c. oats
  • 1 c. whole wheat flour
  • 2/3 c. white flour
  • ¾ c. brown sugar
  • 2 tbsp vegetable oil
  • 1 tsp baking powder
  • 1 tsp baking soda
  • ½ tsp salt
  • 2 eggs
  • 1 small box Jello butterscotch pudding mix
  • 1 ½ tsp cinnamon
  • 1 tsp vanilla extract
  • ¼ c. ground flax

Stir the cider vinegar into the almond milk (this is to mimic the flavor of buttermilk).  Then combine all ingredients, mixing until just blended.  Spoon the batter into greased muffin tins, sprinkle the tops with cinnamon and sugar, and bake at 325 for about 25 minutes.

Easy breezy, no?  Try making up a batch and giving them to a friend.  Actual muffins > muffin batter.

Our daily bread

When my mom was in high school, her family hosted a foreign exchange student from Sweden.  They’ve stayed in touch for a good 40 years, and in the summer of 2009 the former exchange student, Katie, invited me and my mom to come visit.  She said if we came in July we could “pick berries and mushrooms and have lovely sunshine,” and who’s going to turn that down, huh? Not us.  So we went and stayed a week, and there was indeed berry-picking and lovely sunshine, as well as boats, Stockholm sites, good food, and great company.

Being serious breakfast people, we were particularly enamored with the toasting bread Katie’s husband Bob baked, and asked about the recipe.  He slaved away for a good hour at his computer, switching the measurements from metric, and I’m eternally grateful to him for this.  Store-bought bread has all but disappeared from my life because I love this stuff so much.  So how about a little step-by-step bread-baking action, complete with dorky how-to photos?  Baking yeast bread is a little intimidating, but it’s really just a matter of time and temperature.  Plus, if you screw it up, you can just tell yourself that flour is cheap and chalk it up to the mysteries of science.    Here goes!

Bob’s Wholemeal and Rye Bread (yields 1 loaf and about 16 rolls when we make it, or 3 loaves if you’d rather)

STAGE 1: Make the starter for the dough either the night before or the morning of baking.

  • 1 1/4 c. rye flour
  • 1 1/4 c. whole wheat flour
  • 4 c. boiling water

Mix the ingredients and then cover for at least 4 hours at room temperature.  The starter will resemble Oliver Twist-style gruel, like so:

STAGE 2: Mix 1 3/4 c. lukewarm water (about 95 degrees) with 3 (.25 oz) packages of active dry yeast.  Whisk the yeast into the warm water, and then add it, along with the following ingredients, to the starter:

  • 1 1/2 c. rye flour (plus, reserve an additional 1/2 c. in a separate bowl to use for kneading)
  • 1 1/2 c. whole wheat flour (again, reserve 1/2 c. for kneading)
  • 2 1/2 c. bread flour (same–reserve 1/2 c. of this as well)
  • 1/2 c. honey
  • 1 tablespoon salt

I would suggest working in the water + yeast and honey before you start adding flour.  Try a potato masher if a spoon isn’t working out for you.  Then add flour gradually.  I’m not gonna lie to you–this is challenging.  The dough will be pretty stiff, so you should choose a sturdy utensil (I learned this the hard way some time ago when I broke a sort-of flimsy wooden spoon clean in half while stirring.)

Sometimes I have to sit down.  I resolved to do more push-ups in the new year, though, so it can only get easier, right?  Anyway, once you have the dough as well-mixed as possible in the bowl, turn it out onto a floured surface and knead for 10 minutes.  It will be somewhat sticky to begin with, but gradually incorporate most of the flour you reserved above and it should become fairly smooth.

(That’s my mom–I usually make her do the hard parts of a recipe and then steal all the glory.)  After kneading, cover the dough with a damp cloth and allow to rise in a warm place for about 3 hours.  Tip: preheat your oven to 200, then turn it off, open the door, and set the dough nearby.  This will help the yeast do its thing.

STAGE 3 (LAST STAGE!): Punch down the dough and knead for 5 more minutes on a floured surface.  (Use flour left over from the bowl you reserved it in earlier.  You can add more if necessary, but you probably won’t have to.)  Then, place about 1/3 of the dough in a greased loaf pan, form the rest into rolls, and place the rolls on a greased baking sheet.  To make the rolls even, just cut the remaining dough in half, then in fourths, eighths, etc., until you think the pieces look roll-sized.  (Remember they will rise a little bit.)

Place the loaf pan and the sheet of rolls in the same warm place as before, covered with a damp towel, and allow to rise again (1-2 hours).  After the dough has risen for the second time, bake at 400 degrees.  The rolls will take 30-35 minutes, and the loaf will take about an hour.  To test for doneness, hold the bread (with an oven mitt, please) and give it a thump on the bottom.  It should sound hollow.

Flour, water, yeast, honey, salt, and some time–that’s all you need to make yourself some honest, healthy bread that will last you quite awhile!  (Well, it’ll last you quite awhile if you store it in the fridge.  No preservatives, you know.)  It’s a wonderful little taste of Scandinavia fresh from the toaster every morning, and although it’s tricky the first few times, it’s a lot of fun to mess around with the recipe.  Farewell for now, folks–I hope the first few days of 2011 have been treating you well!